

Major stress relief this week, it looks like we’ve just sold our existing house. Now only waiting for finance approval for the buyers. Funny how things work out. We redesigned the new house and cut out some of the cool stuff because covid meant we couldn’t sell our current house and even if we could its value was estimated to have dropped 10% or more.
To be honest house prices in our area at the moment are ridiculous and we both feel very uncomfortable about participating in an unaffordable market. The only way we can rationalise it is our small farm project will, all things going to plan, generate a great deal of community good to offset the negative. Neither of us are sure this calculus is valid, but we can’t see any alternatives.
In the end the house sold in less than a week and for about 10% MORE than we had budgeted for! So we could have left everything in and it would have all worked out – c’est la vie!
Apart from a recent 5 day lock down this is the reason we haven’t had much time to be at the farm recently. However, our new house is now done to lock up and waiting for the builders to release it to us.
So the last couple of days have been enjoyable, getting to work on the farm. Today’s action was building the front fence. So I thought it might be a good time to introduce a couple of fencing ideas and talk about tools.
Our front fence will be mostly star pickets (or Y posts in the US) because they are easy to install and relatively inexpensive. They have some issues though. When you strain a wire running through a star picket, if that picket is lower than its neighbours (like in a gully) then it will just pull out of the ground as you strain up the wire. So how to avoid?
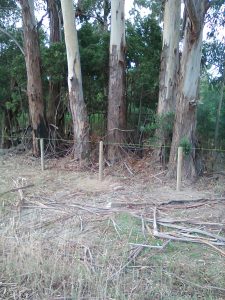
The bad news is you will have to use some conventional posts, perhaps treated pine as here. The good news is because of physics you can use quite thin posts. You’ll need three for each low point in the fence line as shown here. (it’s not as flat as it looks)
This set up doesn’t have the cross poles on yet and I’ll discuss why shortly. Now, placing the fence posts the ratio between exposed height above the ground and the length of the cross rails should be between 2.5:1 and 3:1. These posts are 900mm above ground and are set just under 2400mm apart. 2.4m is a standard length for pine poles and we put the posts just a little closer so we can trim the cross poles to an exact fit.
Once the poles are in place (we’ll post how to secure the cross poles with pictures in the next blog entry) a loop of wire will be run around the base of one of the end posts, right near ground level, and then over the top of the centre post. You can hold the wire on top of the centre post in place using fencing staples, or as we have done, cut a vertical slot in the top of the post with a chainsaw. The loop continues around to the base of the other end post, held in place by fencing staples and then tensioned. 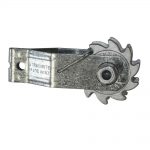 You could use a wire strainer to do this, we like to use a tensioning device like this one so that we can tighten things up later if necessary.
Don’t forget  when you run the loop around the base of each end post to drop a couple of fencing staples over the wire to stop it digging in to the post. Also spray the wire with some veggie oil, or soapy water or some sort of lubricant to help it slide through as you tension.
When you strain the wire the outside posts will want to bend inward under the force, but because the cross rails hold them apart they cant. So the force is transferred downward to the centre post, holding it down. This set up is not suitable as an end piece, in other words it’s not strong enough side to side to hold the lateral force of 4 or more strained wires (we’ll do a post on end pieces soon), but it will be very effective at stopping your low point post from coming out of the ground next time you get some heavy rain.
Why did it take me more than half a day to put in 20 star pickets and 3 posts? (That’s why we don’t have the cross rails on yet btw). Glad you asked because it leads to a discussion about tools and also safety!
Power Augurs
 These are really useful bit of kit! BUT…they come with issues of their own. Some while ago we bought a relatively inexpensive unit via eBay a bit like this one. We originally had ideas about a larger tractor but soon realised this was not going to work with our soil management strategies (see the post about Ken the tractor) and so we had envisioned a post hole digger on the PTO of the tractor. However, it’s a bit too much to ask of Ken’s 18Hp 2 cylinder engine! The unit above was mainly bought to do planting, but it’s doing post hole digging duties currently.
It’s scarily powerful, starts easily, is reasonably light for one person and will break your hand in an eye blink. Part of the issue is the 2 stroke engine. 2 strokes really only generate a decent amount of power when they are at higher RPM. In other words when you give them a bit of welly, but that’s exactly the opposite of what you need in a post hole digger. The faster the augur is turning, when it inevitably jams, the faster the motor and body are going to spin round and smack your hands or arm if you are in the way. So our really strong suggestion is if you are going to buy one, and if you are doing a lot fencing you might want to, then save up for a four stroke model.
The other issue with the cheaper augurs is they have no break off so when they hit something the augur can’t cut – physics takes over and the unit spins. Believe me it freaking hurts when you get clobbered! More expensive units make provision for this situation and will break off the drive connection at very high instantaneous loads. If the budget won’t stretch to a higher end unit then hiring one might be the go. The cheaper models really are problematic.
Which ever unit you get you’ll still need to take some serious precautions. Never grip the handles with thumbs on the inside! Unless of course you don’t want your thumbs to be opposable any more. The thickest leather gloves you can find are great, I use welding gauntlets and you’d be surprised how much they reduce an impact. Eye protection of course is a must and also hearing protection. Obvious things like any loose clothing near the augur need to be taken into account as well. There’s some less immediately obvious ones too though. You’ll need a fencing crow bar (see below) and if you have used one before in hot weather you’ll probably have gotten into the habit of standing it up by driving it into the ground rather than laying it down where it will get super hot. If you do this habitually, and I do, make sure you drive it in miles away from the augur. It’s bad enough getting hit by the power augur but it’s worse when it drives your hand into the crowbar…and yes that’s dumb personal experience.
Hand held augurs are useless with rocks, you’ll need to remove even very small stones manually and they are downright lethal with tree roots. Beware the tree root you just glance the edge of as the hole goes down. Because above the cutting blade on the augur there is nothing to cut the root it will just grab and you’re back to getting our hands out of the way quick smart.
You can see from the picture above the posts are right under trees and they are also right on an old creek bed. So the ground was full of rocks and roots! When that happens you’re back to manual and we’ll discuss tools in a moment. Just another quick tip with power augur though, they also struggle with very dry, compacted fine soils because the cutting blade just wont get a grip. If you strike this then dig the start of the hole and then fill it with water and comeback in a few hours or the next day. You’ll find the augur rips in much more easily. EDIT – don’t be impatient like me and start drilling away while there is still water in the hole. Aside from you’ll end up looking like you just did a mud bash it also makes the sides of the hole super grippy to the augur blade. The slightest tilt and it will grab.
So you’ll need some manual tools. This list is our suggestion, most of them, perhaps not the post hole shovel, you readily find at garage sales or markets for a fraction of the new price.
Fencing Crowbar
 You’ll note this guy has a chisel end perfect for cutting through tree roots or getting under rocks. The blunt end is tamping down the soil you put back into the post hole to stabilise the fence post. Put about 15cm of dirt into the hole with the post in there as well. Make sure the soil is evenly distributed around the post and then tamp it down with the blunt end of the crowbar. The post should be able to stand up by itself now. Using a spirit level to guide you, nudge the post so it is vertical both side to side and back to front. Fill in to about half the hole depth and repeat the process keeping the compression of the soil even around the post, then fill in the rest and tamp down firmly.
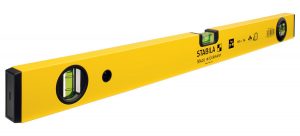
Spirit Level
You’ll need a nice long spirit level like this one. we use a 600mm one.
Post Hole Shovel
 These double spade units act like giant set of tongs for removing material from the bottom of holes greater than 100mm in diameter. They save you getting down on your knees and clearing the hole by hand. Our place is alive with bull ants and wolf spiders the size of a wolf (just kidding….wolves don’t really come that big) so even with gloves on the less fiddling around in the dirt with your hands you can do the better.
Post Hole Digger
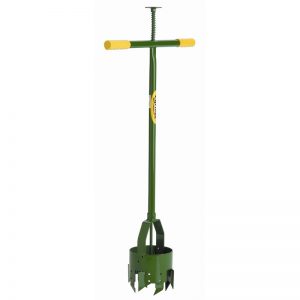 These manuals diggers are a hell of a lot safer if you know there are loads of rocks or roots than a power augur. Of course though they are a fair bit more work and also wont cut through rocks or roots either, but they also won’t tear themselves out of your hands when you hit some. We recommend a 4 inch and a 6 inch if you can get them. We got ours from the local trash and treasure market. Get a 4 inch if you can only get one as it’s pretty easy to open out a hole using the crowbar once the whole is dug to depth.
Pro-tip – the spring loaded handle on top allows you to compress the soil you’ve loosened with the digger head so that it doesn’t fall out when raise the digger out of the hole when it’s full. Sometimes though, if the soil is fine enough, even that wont work. If you strike this, throw a handful of grass into the digger as it cuts and you’ll find it holds the soil enough for you to remove it from the hole without it falling back in.
As you can see from the photo at the top of the page I had expert help and supervision from Angie. I think she was curious why anyone would dig a hole if they weren’t going to put a bone in it!
Happy fencing and catch you next post.